Before you start
Company account sign-in for Modak is set up for each workspace. Please prepare the four items below.
What you need
- Modak AI Plus plan — Company account (SSO) and directory sync are available from the Plus plan. You can enable them in Workspace settings › Security & audit. (They're also included in the Modak AI Agent plan.)
- A Modak workspace admin account — you should be able to open “Workspace settings” from the gear icon at the top left.
- Company IdP admin permissions — any provider that supports SAML 2.0 works, like Okta · Microsoft Entra ID · Google Workspace · OneLogin · ADFS.
- Someone who can edit your company domain's DNS — you'll add a single TXT record. (This is the step that confirms the domain belongs to your company.)
| What you used in Slack | In Modak | Where |
|---|---|---|
| SAML SSO | Company account (SAML) login | Workspace settings › Login · SSO › ② |
| Require SSO | Require SSO | The “Require SSO” option on the same screen |
| Sign in directly from your IdP | Sign in directly from the IdP app tile | The “IdP app tile” on the same screen |
| Directory sync (SCIM) | Directory sync (SCIM) | Workspace settings › Login · SSO › ③ |
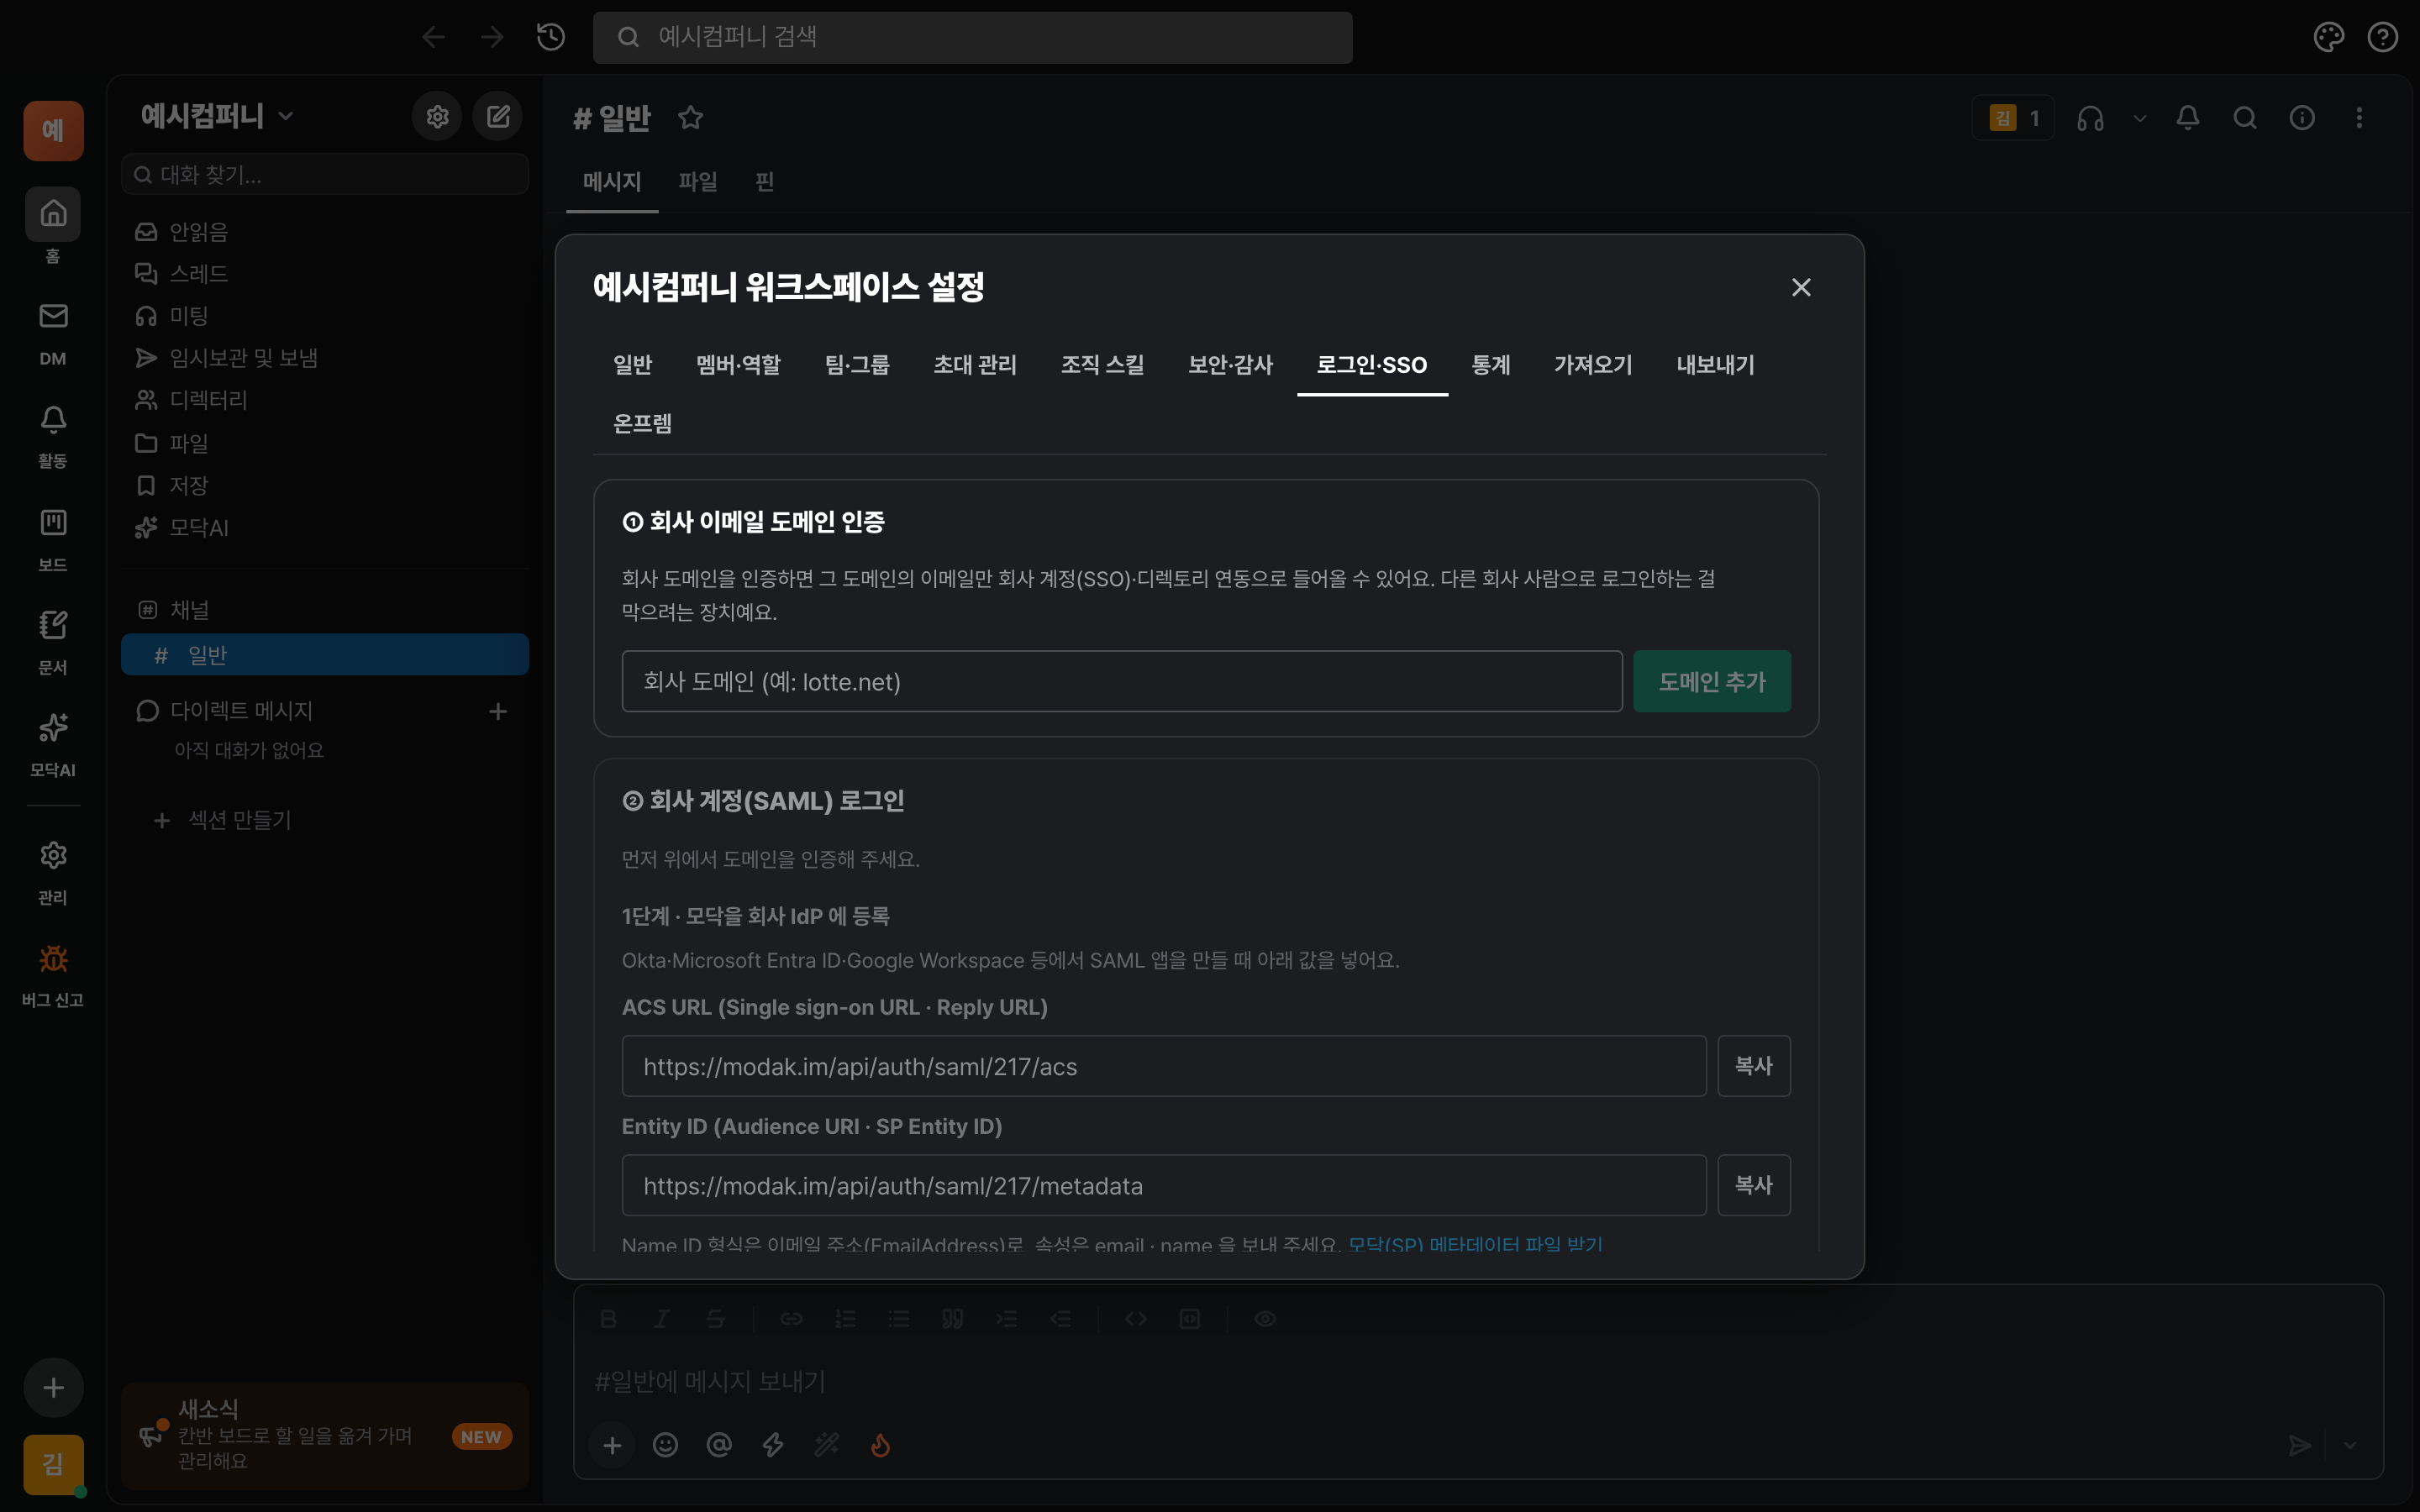
Verify your company domain
Only people with an email on a verified domain can sign in with a company account. This step prevents people at other companies from logging in as one of your company's people, so make sure to do it first. Public email providers like gmail.com or naver.com can't be verified.
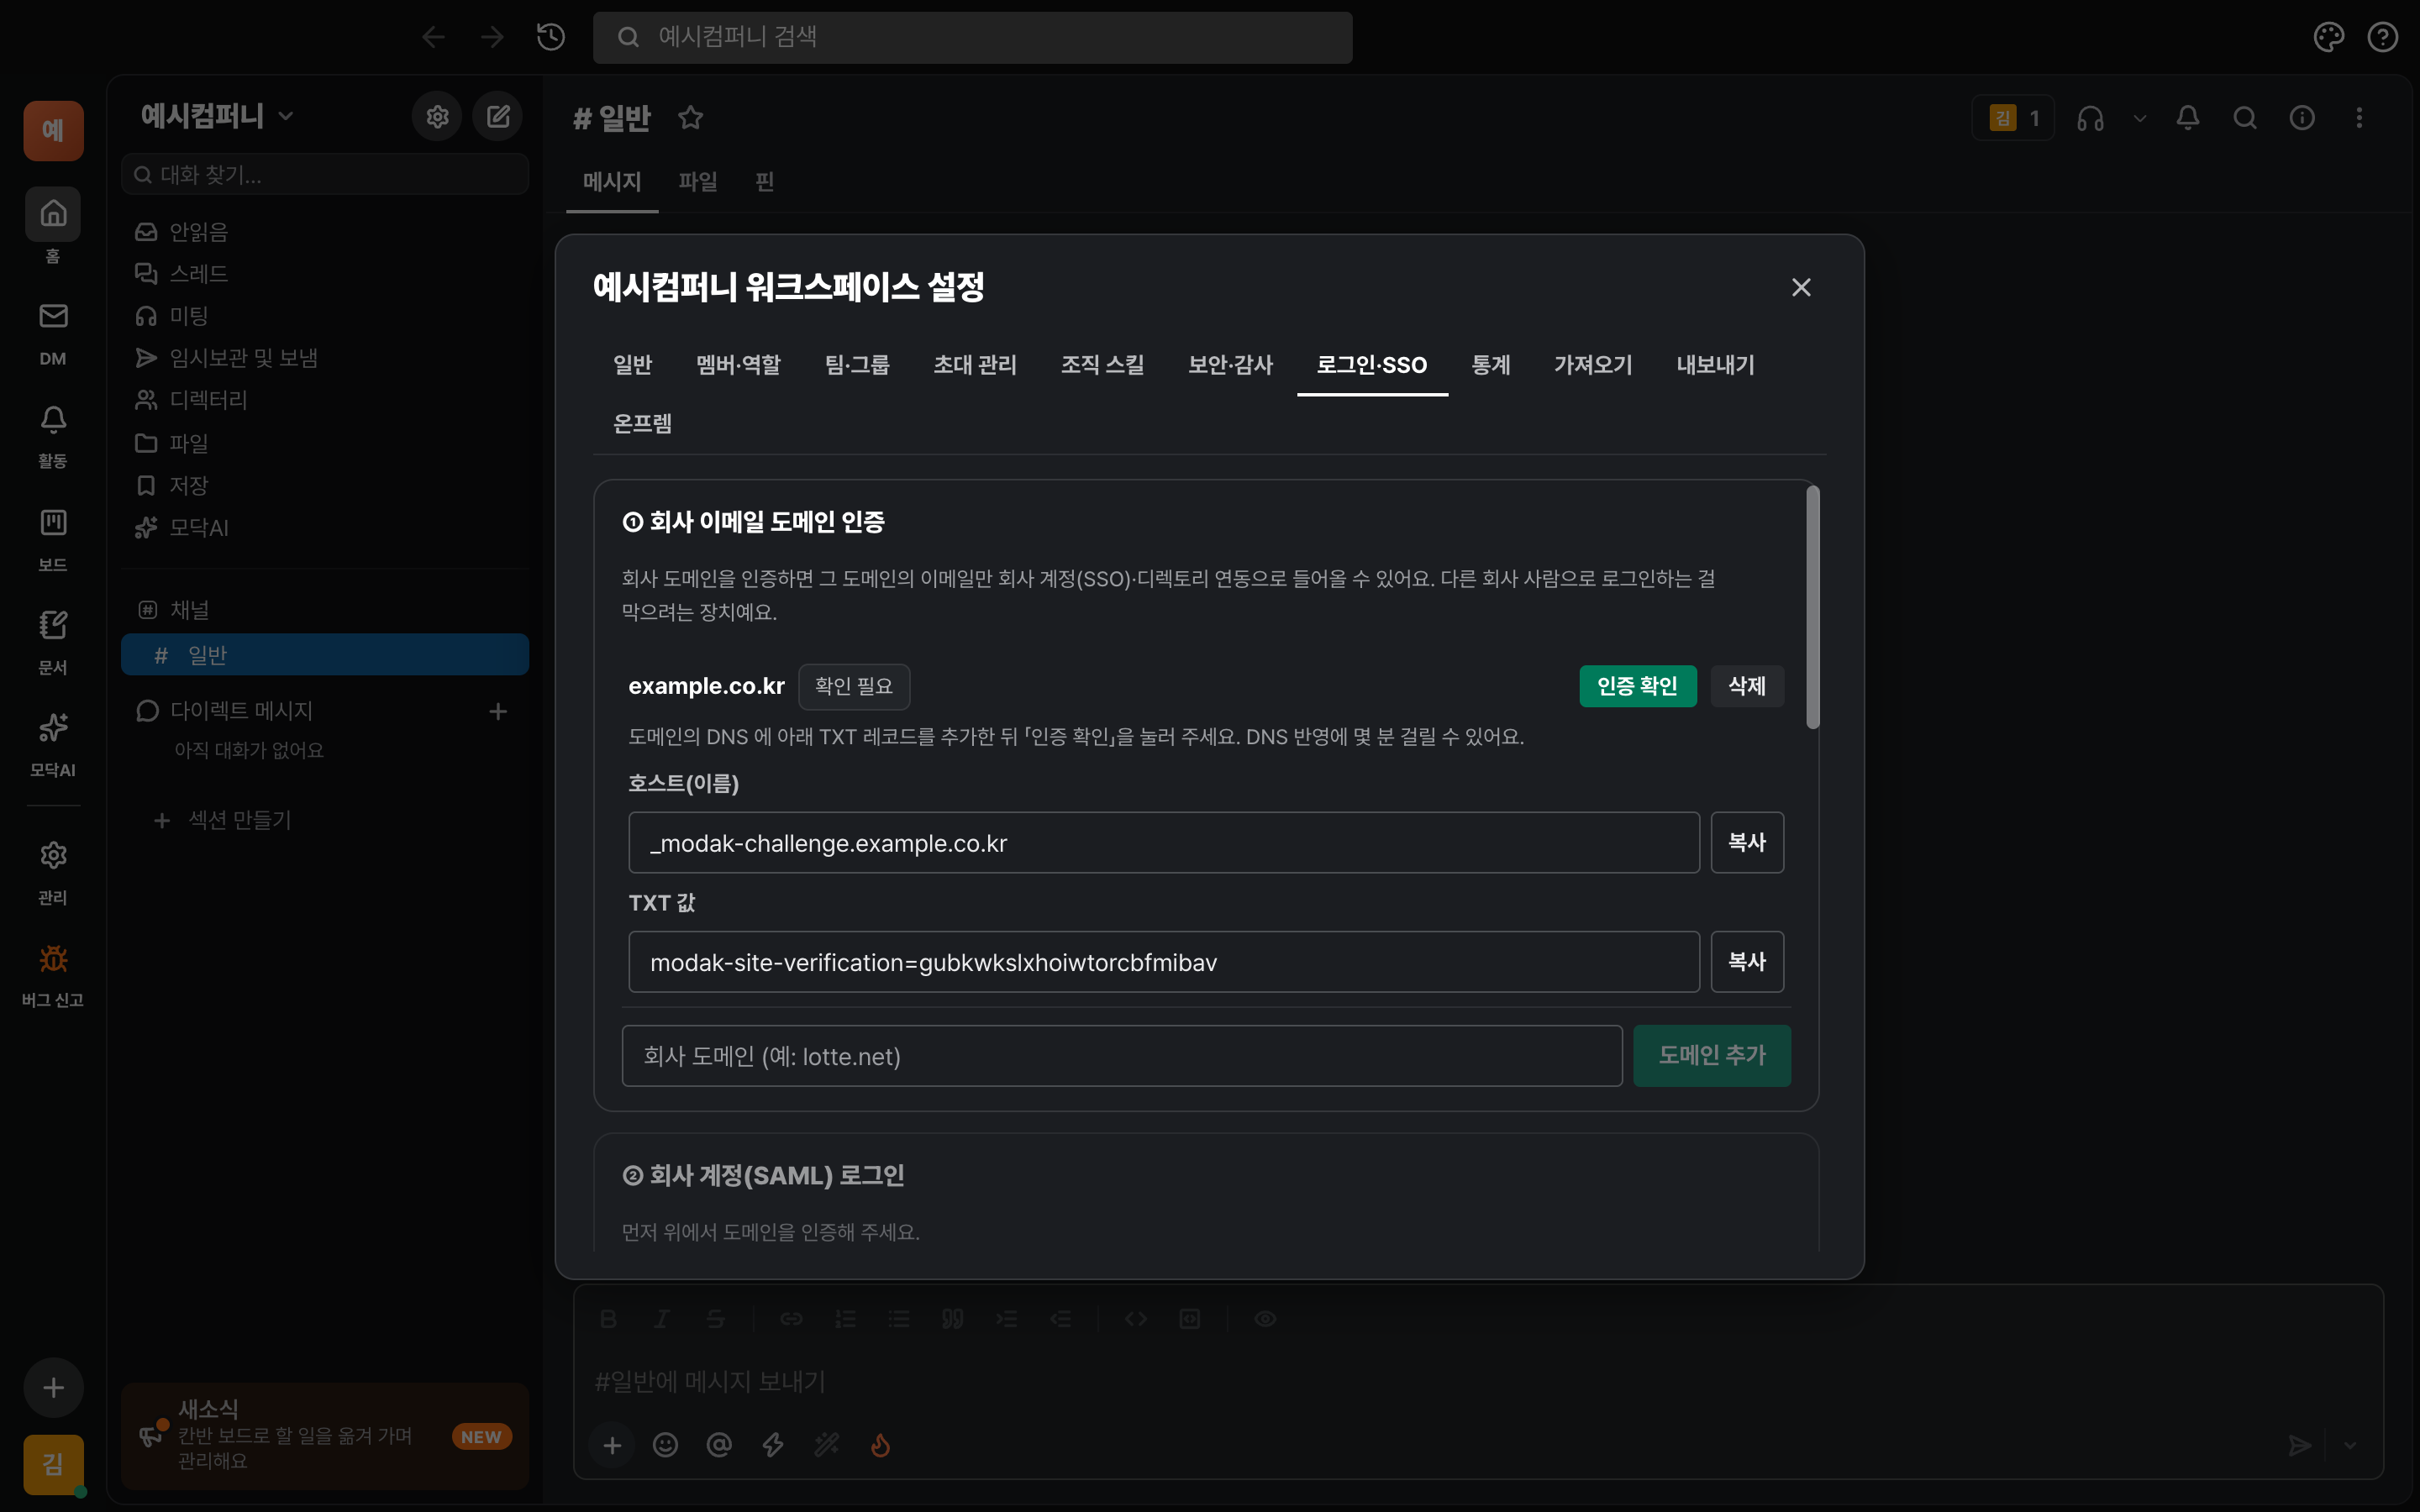
AAdd your domain and get the TXT value
- At the top left of Modak, click the gear icon next to your workspace name → then open the Login · SSO tab.
- Enter your company domain in the ① Company email domain verification field, then click “Add domain”. (e.g.
example.co.kr— the domain only, without the email address orhttp://) - Under the domain, you'll see the host (name) and TXT value. Tap “Copy” for each one to copy them.
BAdd a TXT record to your DNS
- Open the DNS management page for your company domain (Gabia, Route 53, Cloudflare, your company's internal DNS, etc.).
- Add a TXT record. In Host (Name), enter
_modak-challenge; in Value, paste themodak-site-verification=…value Modak gave you exactly as is. - After saving, go back to Modak and press "Verify". You're done once the label next to the domain changes to "Verified".
_modak-challenge; if you need to type the full name, enter _modak-challenge.domain exactly as Modak shows it. DNS changes can take anywhere from a few minutes to a few hours. Once verification is done, you can delete the TXT record.Good to know
- A domain can only be verified for one workspace. If the domain has already been verified somewhere else, you'll see a notice — if it's really your company's domain, let us know at support@modak.im.
- You can add up to 10 domains. If several affiliated companies share one workspace, be sure to verify all their domains.
Register Modak in your company IdP
Create a SAML app in your IdP (Okta, Entra ID, Google, etc.) and enter the values Modak gives you. You'll find them in Modak under Login · SSO › ② Company account (SAML) login › Step 1.
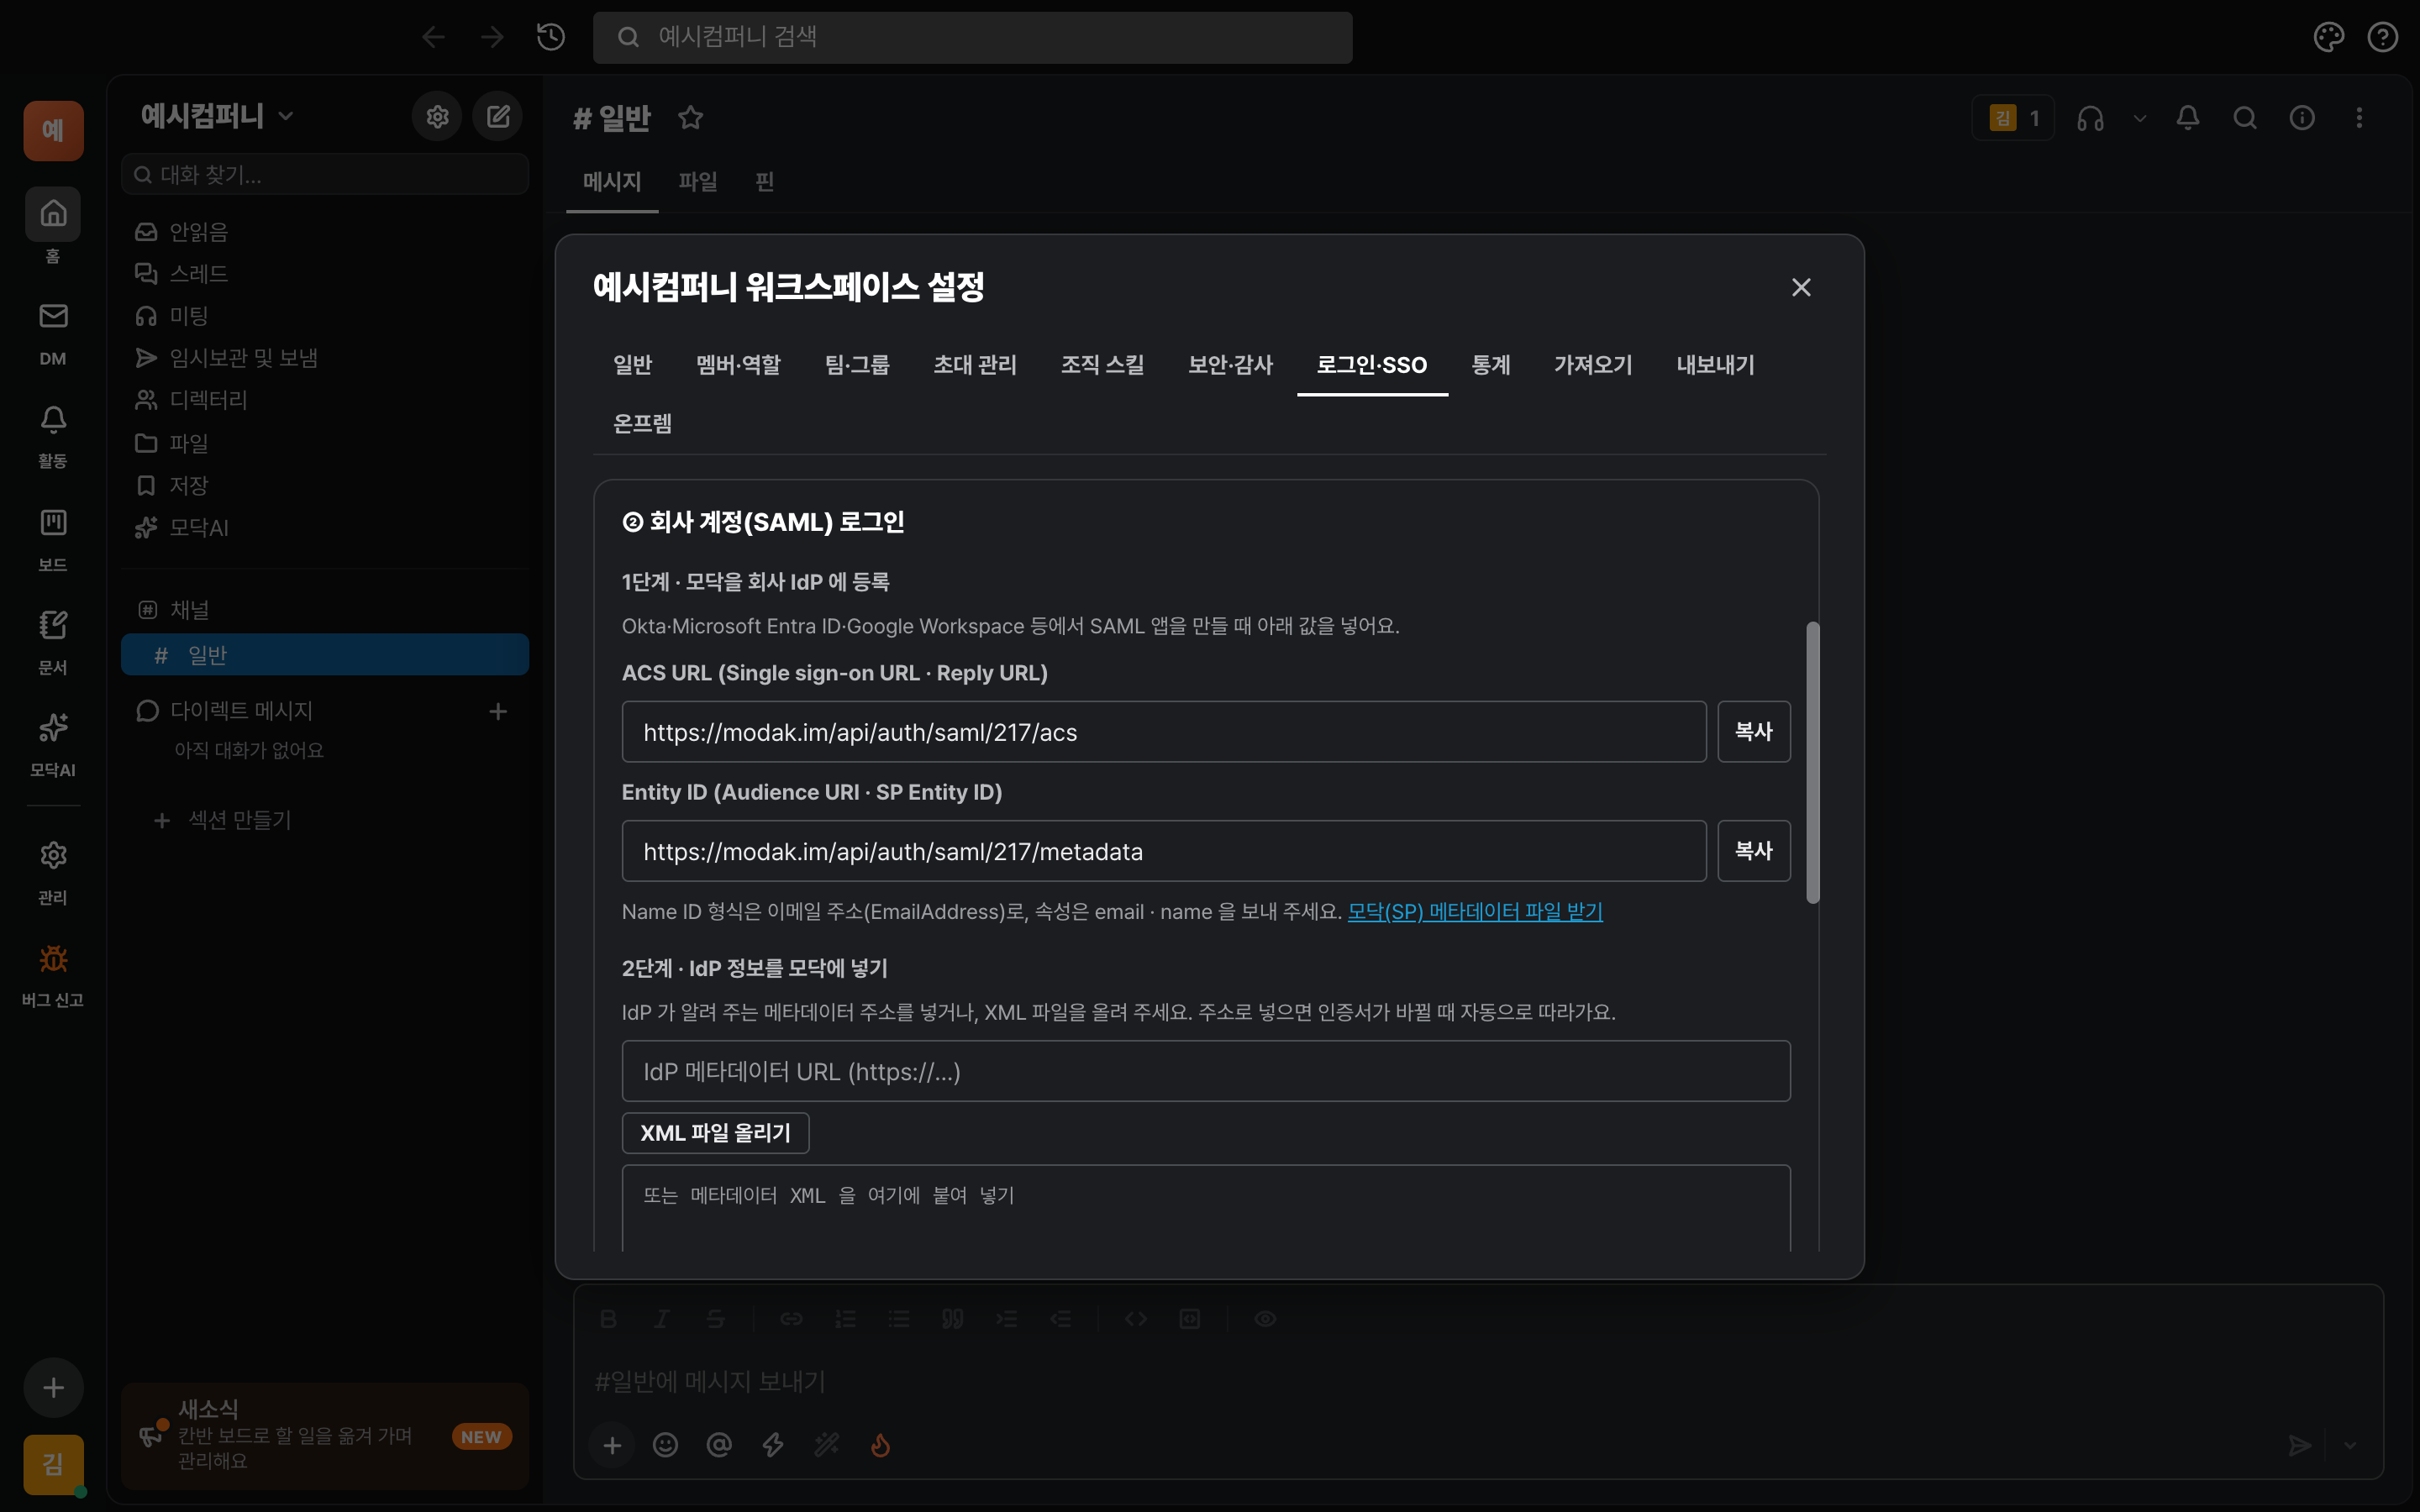
| The values Modak gives you | What your IdP calls it |
|---|---|
| ACS URL | Single sign-on URL · Reply URL(Assertion Consumer Service URL) · ACS URL |
| Entity ID | Audience URI · SP Entity ID · Identifier |
| Name ID format | Email address (EmailAddress) — the user name is their email |
| Attributes (optional) | email · name — not needed if the Name ID is an email address |
Okta
- Choose Applications → Create App Integration → SAML 2.0. Name the app Modak.
- Enter Modak's ACS URL in Single sign-on URL and the Entity ID in Audience URI (SP Entity ID). Set Name ID format to EmailAddress and Application username to Email.
- (Optional) In Attribute Statements, add
email=user.emailandname=user.displayName. - After creating the app, copy the Metadata URL (or the Identity Provider metadata link) from the Sign On tab — you'll need it in Step 4.
- In Assignments, assign the people or groups who'll use Modak.
Microsoft Entra ID (Azure AD)
- In Enterprise applications → New application → Create your own application, choose Integrate any other application you don't find in the gallery (Non-gallery) and create it with the name Modak.
- In Single sign-on → SAML, open Basic SAML Configuration and enter Modak's Entity ID in Identifier (Entity ID) and the ACS URL in Reply URL (ACS).
- In Attributes & Claims, set Unique User Identifier(Name ID) to user.mail and the format to Email address. If your UPN is different from your email, be sure to change it to mail.
- Copy the App Federation Metadata Url under SAML Certificates — you'll use it in step 4.
- In Users and groups, choose who can use Modak.
Google Workspace
- In the admin console, go to Apps → Web and mobile apps → Add app → Add custom SAML app. Name the app Modak.
- Download the XML file from Download metadata on the Google IdP details screen — you'll upload it in step 4.
- In Service provider details, enter Modak's ACS URL for ACS URL and Entity ID for Entity ID. Set Name ID format to EMAIL and Name ID to Basic information > Primary email.
- In the app settings, change User access to On (you can set this per organization).
Google Workspace doesn't support automatic user provisioning (SCIM) for custom SAML apps — use it for sign-in (SSO) only, and invite people or let them join automatically on their first sign-in.
Other IdPs (OneLogin, ADFS, Keycloak, Ping, etc.)
- Create a new SAML 2.0 app, then enter the ACS URL and Entity ID from the table above.
- Set Name ID to Email address, and for signing, use Response or Assertion signing (RSA-SHA256).
- Have your IdP's metadata URL or metadata XML file ready.
- Some IdPs will fill in the values above for you at once if you upload the XML file you downloaded from Modak's 「Download Modak (SP) metadata file」.
Add the IdP details to Modak
AEnter the metadata and verify it
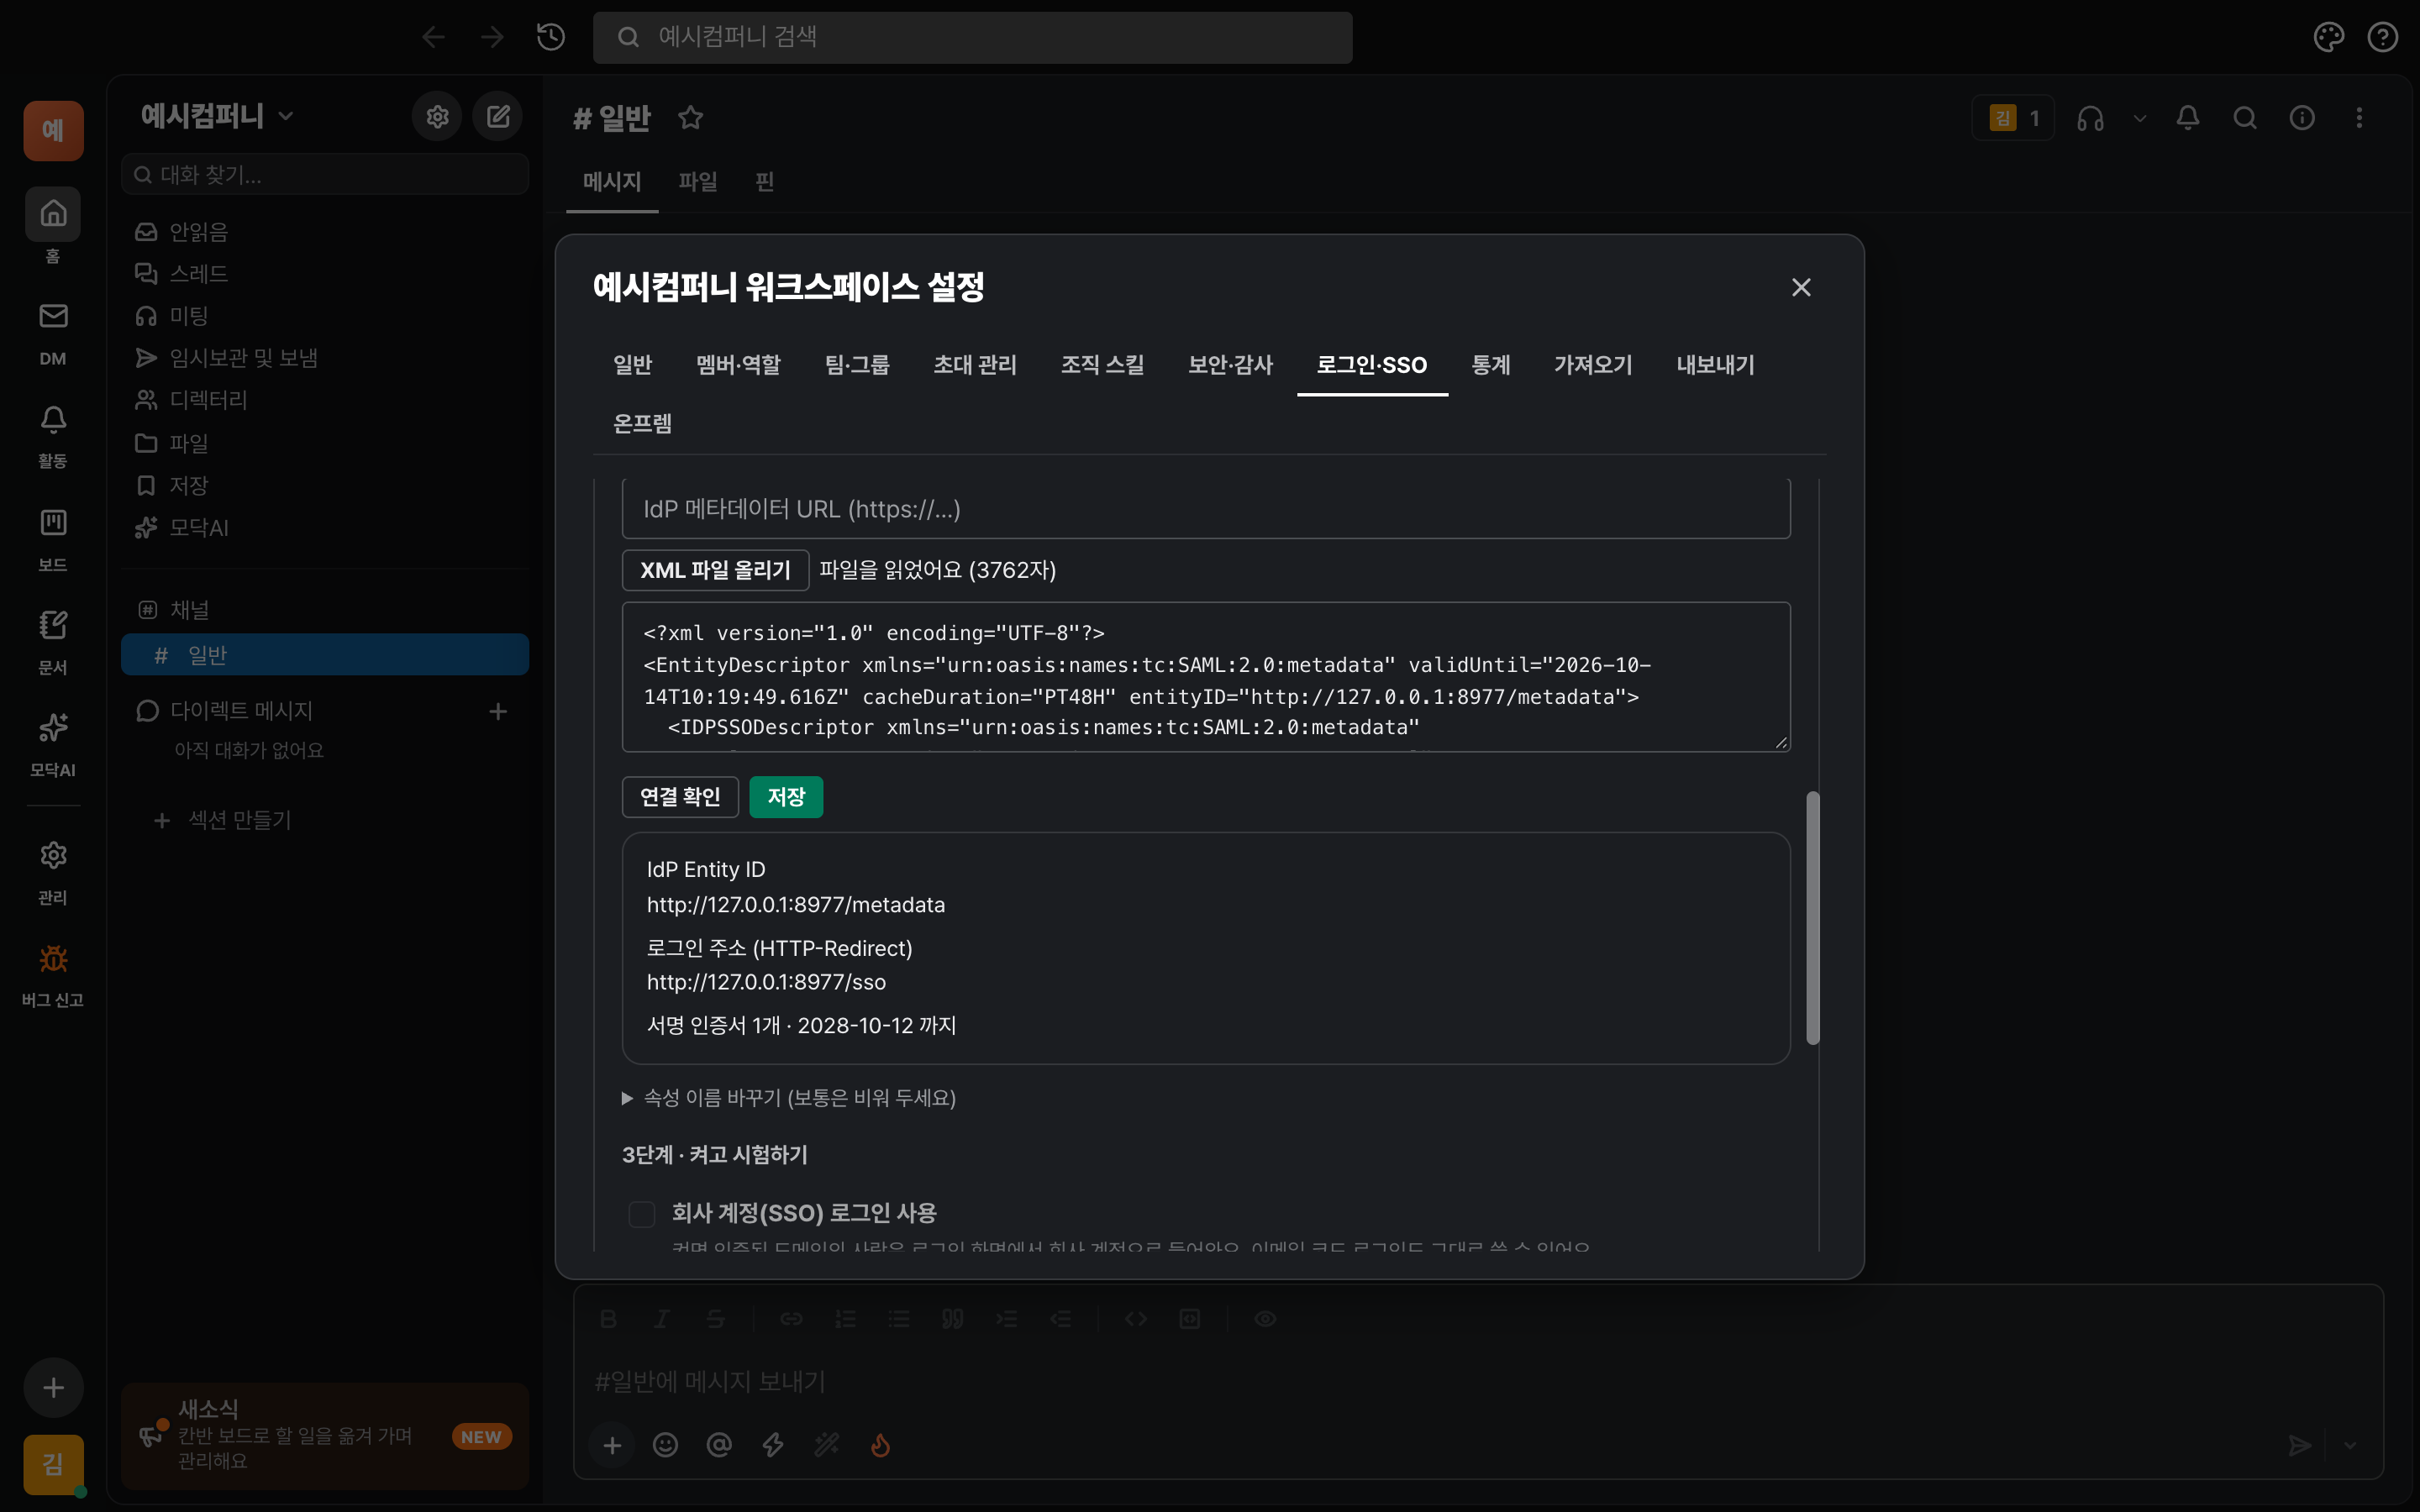
- In Modak, open Login · SSO › ② › Step 2 and paste your IdP's metadata URL. If you have an XML file, click 「Upload XML file」 to choose it, or you can simply paste the XML into the field below.
- Click “Check connection”. If the IdP's Entity ID, login URL, and signing certificate count and expiration dates show up, the metadata was read correctly.
- Click “Save”.
BIf your email or name attribute names are different (you can usually skip this)
- Expand “Rename attributes”.
- If the IdP sends the email under a different name than
mailoremailaddress, enter that attribute name. If you leave it blank, Modak looks foremail·mail·emailaddress·upn· Name ID (in email format), in that order.
Turn it on and run a test login
ATurn it on
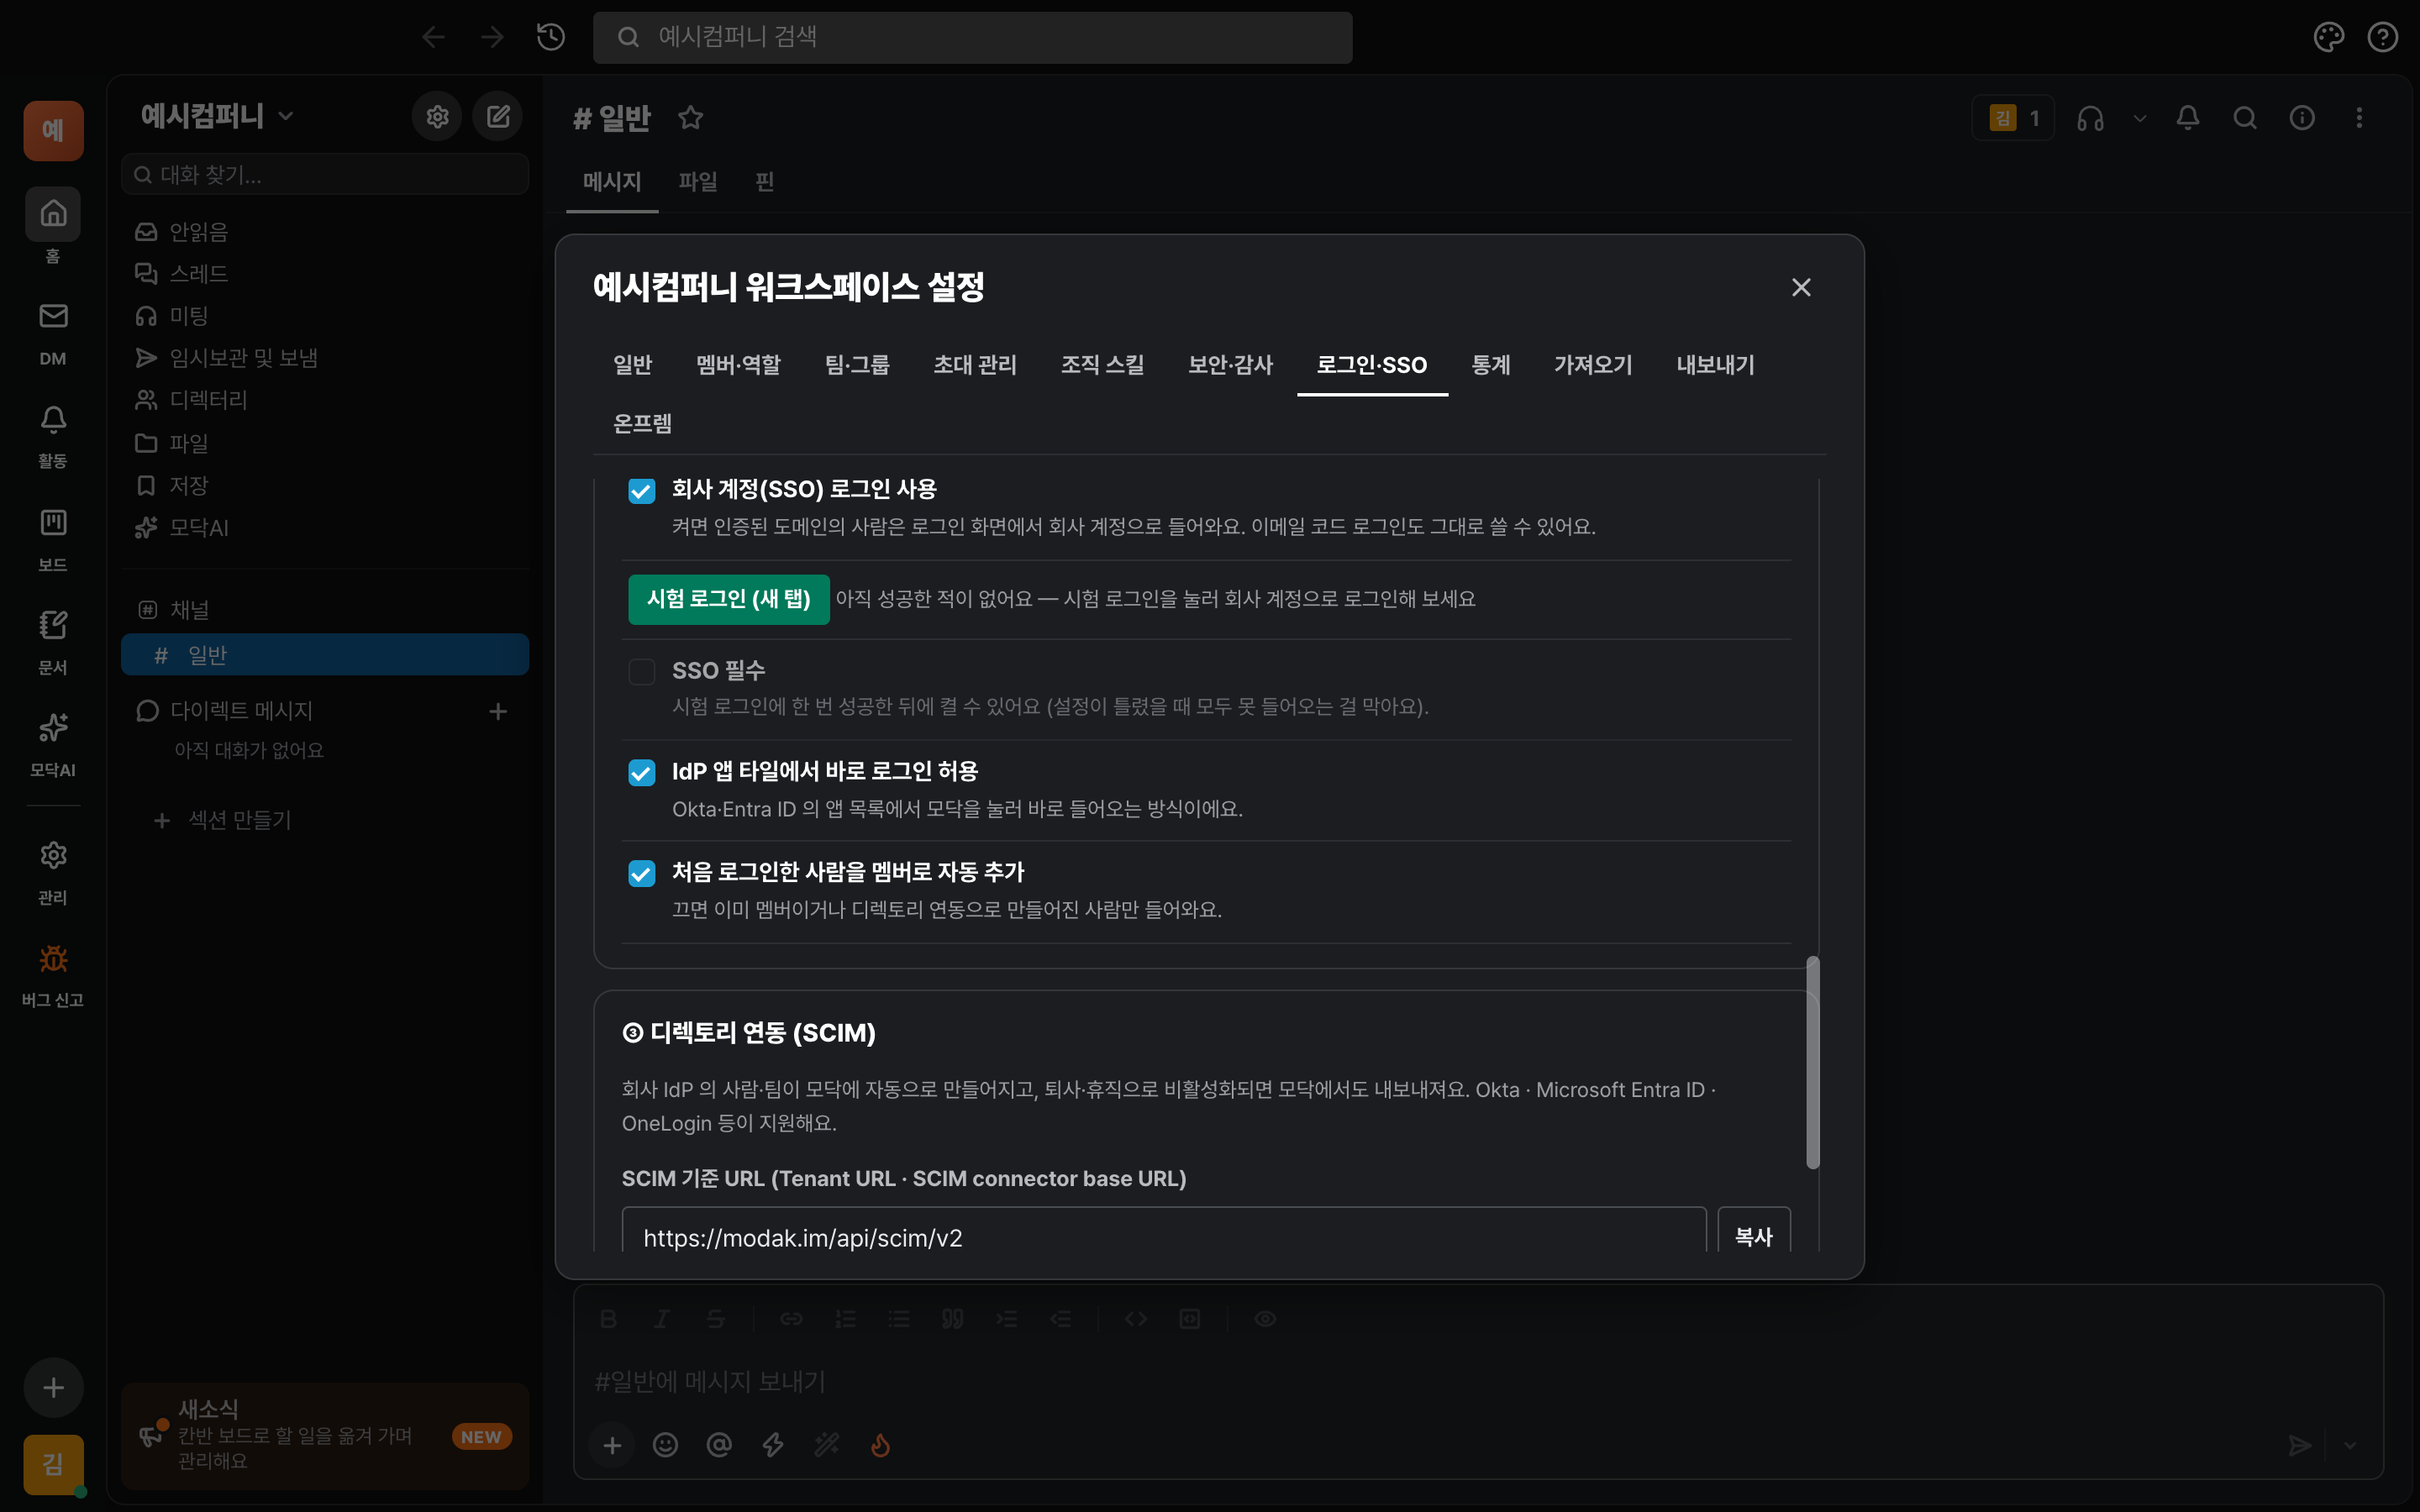
- In Step 3 · Turn on and test, turn on "Use company account (SSO) sign-in". It won't turn on without domain verification and IdP metadata.
- Just turning it on doesn't block existing sign-ins (email code · Google). Nobody gets kicked out until you finish testing.
BTest sign-in
- Click “Test login (new tab)”. Your company IdP sign-in screen opens.
- When you sign in with your company account, Modak opens and the settings screen shows the "Last success" time.
CHow your team signs in
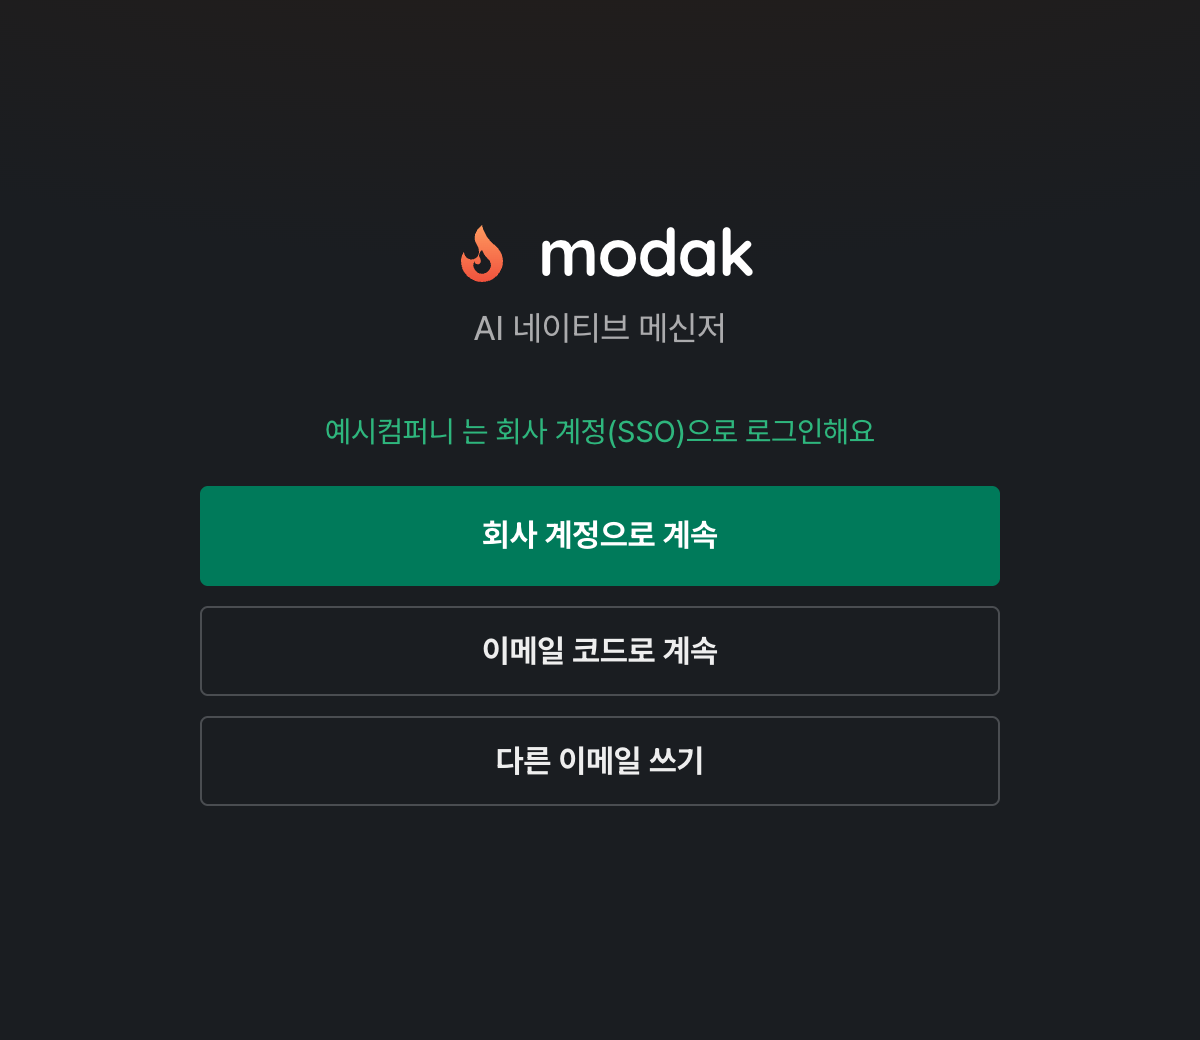
- On the Modak login screen, enter your company email.
- If SSO is set up for that domain, you'll see “Continue with your work account” instead of a verification code email. Tap it, and after signing in through your IdP, you'll go straight to the workspace.
- You can also jump straight into Modak by clicking it in your IdP's app list (tiles). (To turn this off, switch off “Allow direct sign-in from IdP app tiles”.)
What about people signing in for the first time?
- When someone who isn't in the workspace yet signs in with SSO for the first time, they're automatically added as a member. They only see the default channels, and their role is member.
- If you don't want people added automatically, turn off "Automatically add first-time users as members". Then only people who are already members or were created through the directory sync in Step 7 can sign in.
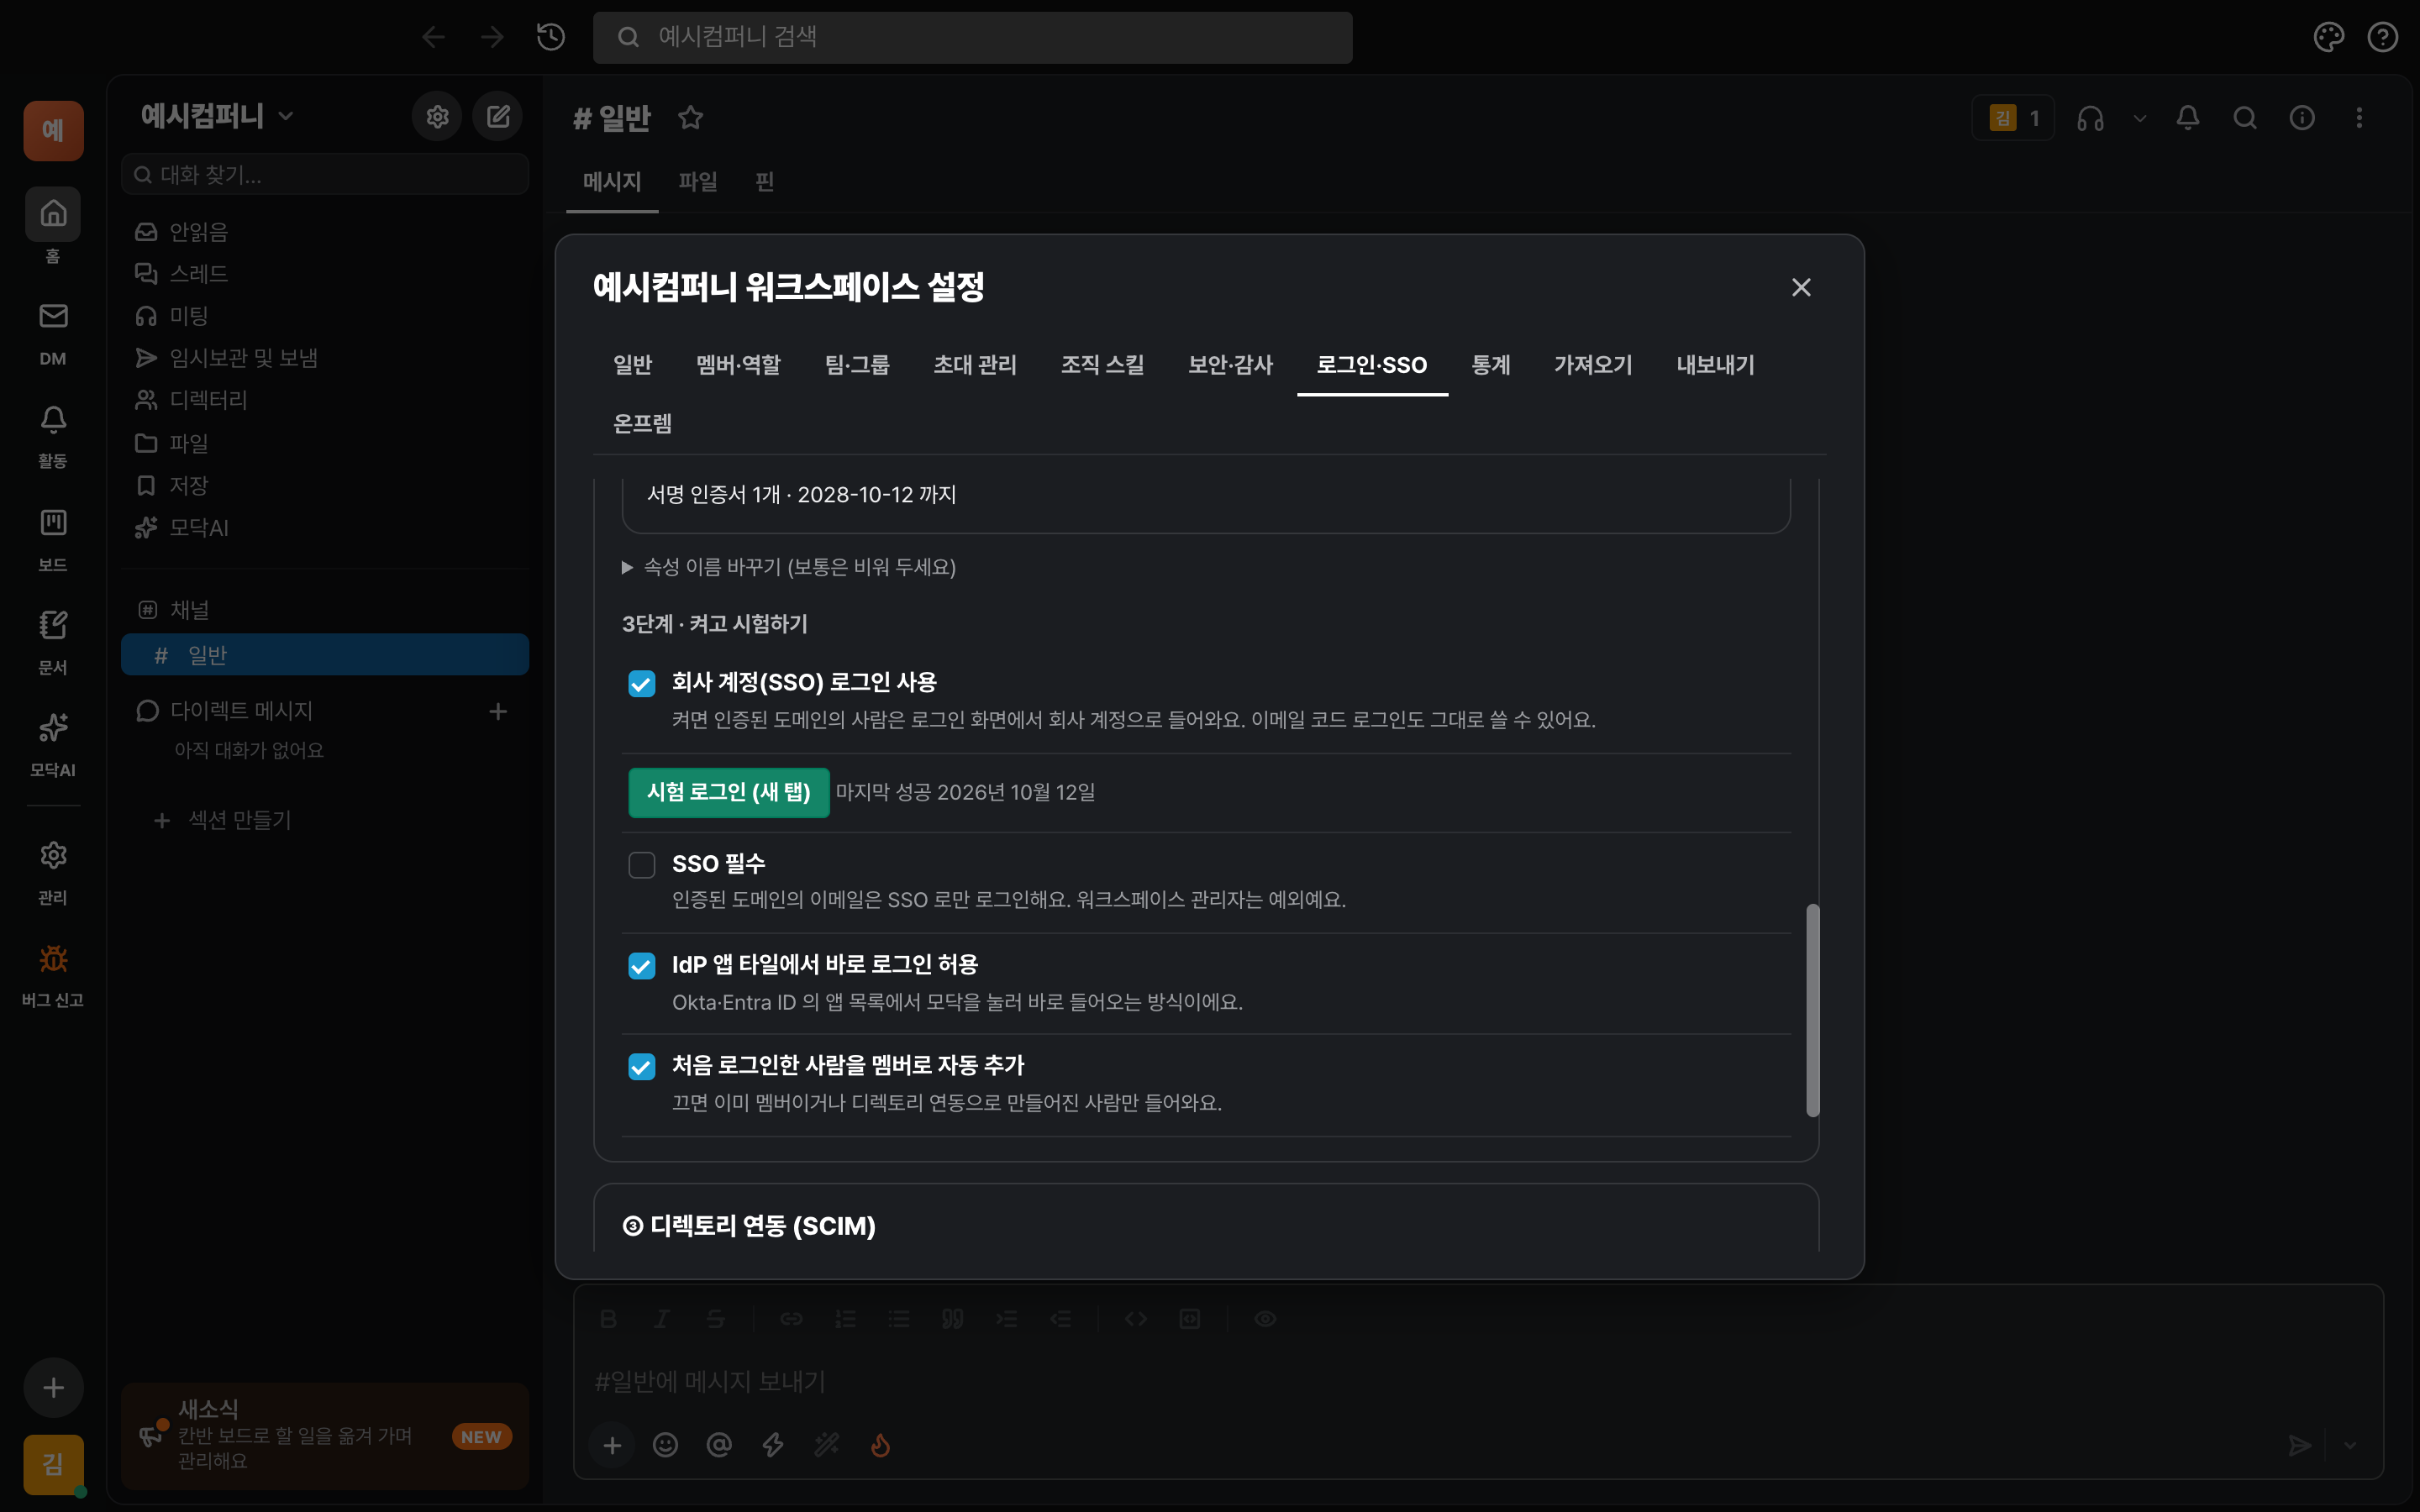
Turning on Require SSO
When “Require SSO” is on, emails on verified domains can only sign in with a company account. Email code, Google, and Works AI sign-ins are all blocked.
Good to know
- Emails that aren't on your company domain (like guests from outside partners) aren't affected. They still sign in with invite links and email codes, just like before.
- If you turn off SSO or delete all of your verified domains, “Require SSO” gets turned off too.
Automatically manage people and teams with directory sync (SCIM)
When directory sync is on, adding a person in your IdP automatically creates them in Modak, and when they resign or go on leave, deactivating them removes them from Modak too. Your IdP groups connect to Modak teams (user groups), so one @teamname is all it takes to call in your team members.
ACreate a token in Modak
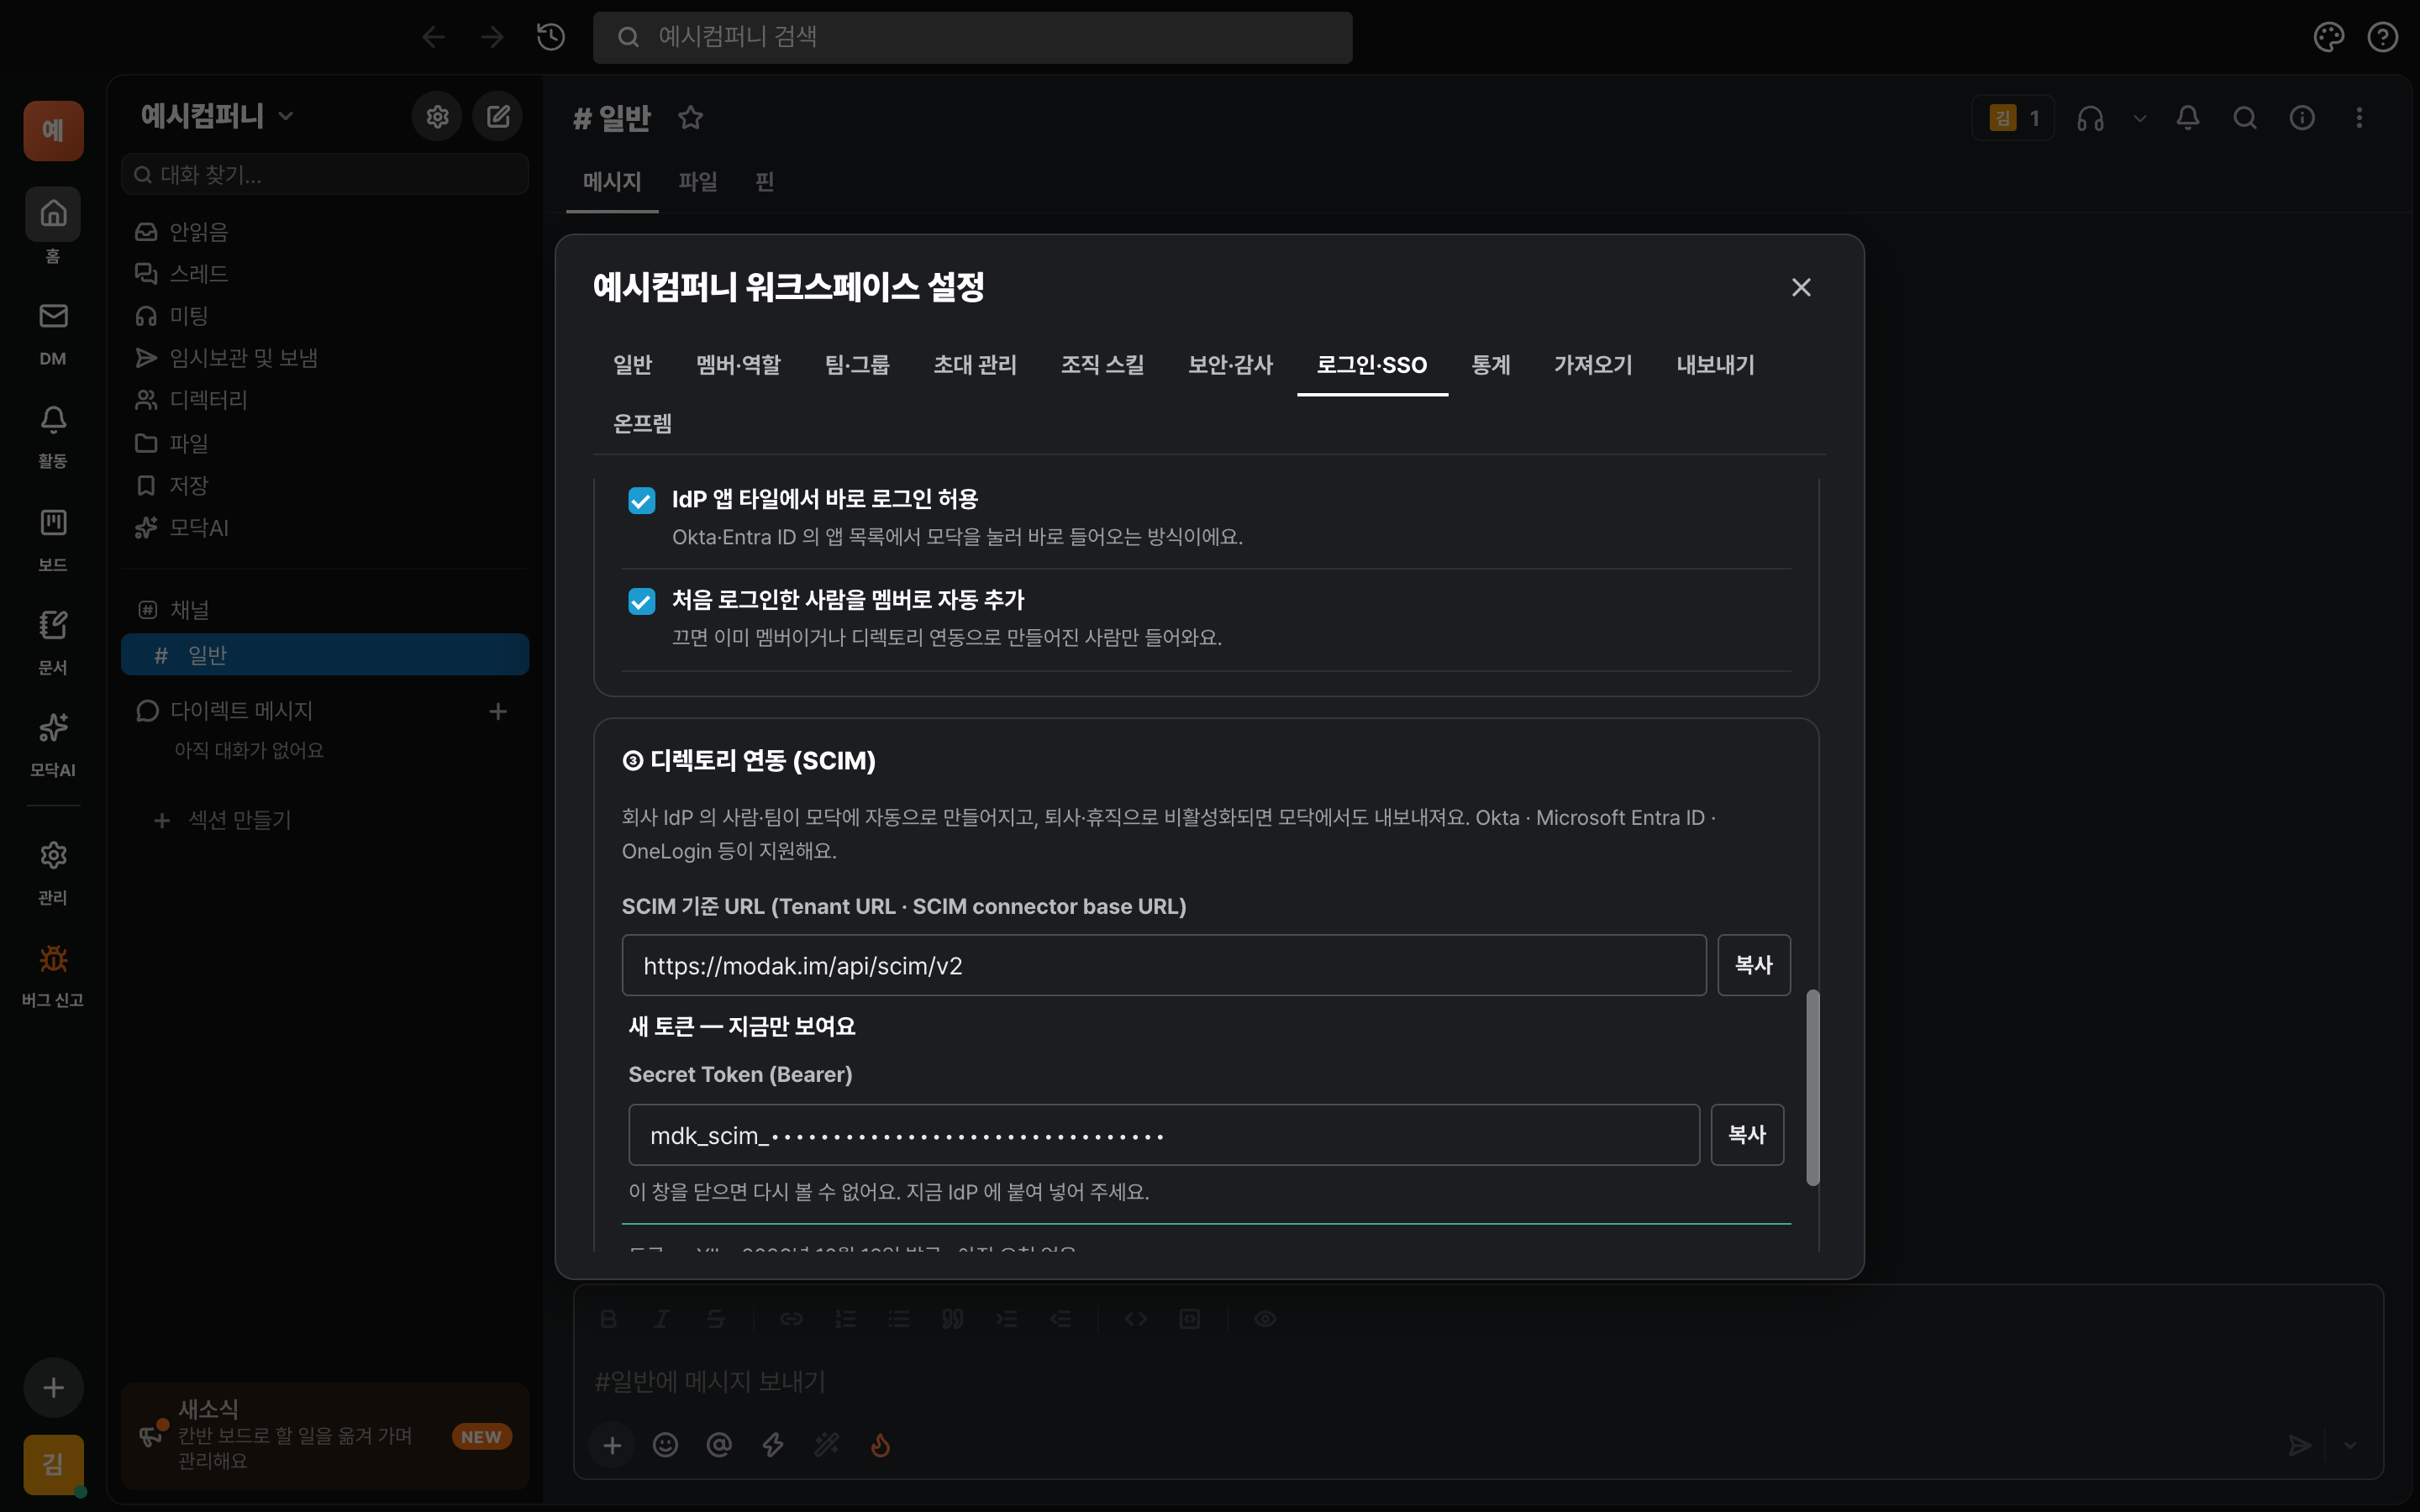
- In Login · SSO › ③ Directory sync (SCIM), click “Create token”. (Your domain must be verified first.)
- You'll see the SCIM Base URL and Secret Token. Tap 「Copy」 for each one and paste them into your IdP. The token is shown only once.
Microsoft Entra ID
- In the enterprise app you created in Step 3, open Provisioning → Get started and set Provisioning Mode to Automatic.
- Enter Modak's SCIM Base URL in Tenant URL and the token in Secret Token, then click Test Connection. If it succeeds, save your changes.
- In Mappings → Provision Microsoft Entra ID Users (formerly Provision Azure Active Directory Users), map
userNameto mail (the company email). If the defaultuserPrincipalNameis different from the email address, the same person won't be recognized. - In Users and groups, choose the people and groups to sync, then set Provisioning status to On.
Okta
- In Okta, prepare an app that supports SCIM provisioning. You can use an app that lets you enter the SCIM base URL and token directly, like SCIM 2.0 Test App (Header Auth) from the catalog. (SAML apps you build yourself may not have a Provisioning tab.)
- In Provisioning → Integration, enter Modak's SCIM base URL in SCIM connector base URL and
userNamein Unique identifier field for users. Set Authentication Mode to HTTP Header and enter the token in the Authorization field. - Once Test Connector Configuration succeeds, save your changes. Under To App, turn on Create Users · Update User Attributes · Deactivate Users. Send groups with Push Groups.
| What it does in your IdP | What happens in Modak |
|---|---|
| Add users (Create) | Anyone with an email on a verified domain is created as a member. |
| User name change (Update) | Their display name in Modak changes (their email address can't be changed) |
| User deactivation · deletion (Deactivate) | They're removed from the workspace. Their posts and files stay, and they come back once you reactivate them. |
| Group creation, adding members, and deletion | A Modak team (user group) is created and its members are matched up |
Good to know
- Emails from unverified domains can't be created. Even if the token is exposed, no one from another company can be added.
- The last admin can't be removed. Roles (admin) aren't changed through SCIM — they're set in Modak. Anyone created through the integration starts as a member.
- People removed through the integration can't sign back in even with SSO. Reactivate them in your IdP to bring them back.
Stuck?
Common situations
- The “Verify” step for the domain keeps failing
- Make sure the TXT record's host is
_modak-challenge(or_modak-challenge.your-domain) and its value is the fullmodak-site-verification=…string. Also check that there are no extra quotes or spaces before or after the value. DNS changes can take some time to take effect. - I signed in, but I'm seeing 「The email domain of your company account isn't verified for this workspace」
- The domain of the email the IdP sends isn't a domain you verified in Step 2. If it's a domain from an affiliate company, add and verify that domain too. If the IdP is sending a UPN or employee ID instead of an email, check the Name ID/email settings in Step 3.
- “Your work account has no email, so you can't sign in” keeps popping up
- There's no email in the IdP response. Set the Name ID format to EmailAddress, or send the
emailattribute. If the attribute name is different, enter it in “Rename attribute” in Step 4 B. - “Require SSO” won't turn on
- You can turn this on only after one successful test login. Please run "Test login (new tab)" in Step 5-B first.
- I changed the IdP certificate and now I can't sign in
- If you entered the metadata as a URL, a new certificate is fetched automatically when you try to sign in. If you entered it as an XML file, go to step 4 and upload the new XML file again and save.
- I'm getting a login time error
- If the clocks on your IdP and Modak are more than 3 minutes apart, sign-in gets rejected. Check the time on your IdP server.
- A person isn't being created through directory sync
- Check the IdP logs to find out why the error happened. The most common causes are ① the email domain isn't verified, ② someone with the same email already exists (set
userNamematching so the IdP looks up the existing person first), and ③ the token was revoked.